Friday, August 31, 2012

Healthy Meal Plan Friday: Labor Day Week

By next week, most of my school-aged moms will have their kiddos back in school.  It's hard to believe, but September is allllllmost here.  School buses are driving their routes, college football is starting (Go Bucks!) and I *think* I see some tree leaves changing.

It's time to pull out the white pants and shorts this weekend and give 'em one more wear.  The Unofficial End of Summer is here.

This week's Healthy Meal Plan:

Meatless Monday:  Best Barbecue Veggie Burgers, Sliced Avocado, Mango
Seared Flounder with Blood Orange Drizzle
, Green Beans,
Parmesan Grits, Cantaloupe
 
Make-it-your-own Baked Penne, Green Salad, Fresh Peaches
Honey Mustard "Fried" Chicken, Coleslaw,Caramelized Onion Quinoa, Raspberries 
Homemade Pizza (Topped with Grilled Vegetables and Feta), Kiwi
Sesame Lime Noodles or Quinoa, Fresh Pineapple


Snack Idea:  Pumpkin Muffins (great for after-school, snacks and a quick breakfast)

Have a great Labor Day Weekend, All!

Life is sweet,
SPC

Wednesday, August 29, 2012

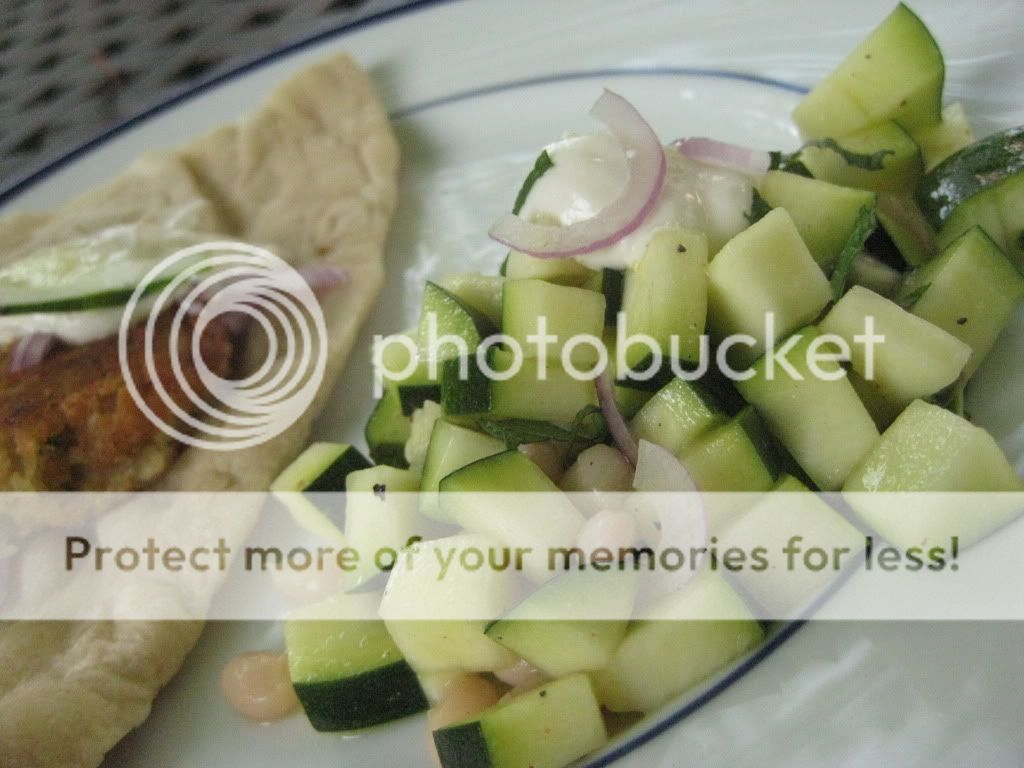
No-Cook Greek Zucchini Salad

One of the things I love best about this time of year is the simplicity of cooking with fresh, garden ingredients. With super-fresh produce, you don't need a lot of fancy-schmancy preparation to create a gourmet dish.

Our zucchini plants keep sprouting new vegetables, inspiring me to find new ways to enjoy them.  Here's a way to use your zucchini as the star ingredient in a super-fast salad for a busy night!

No-Cook Greek Zucchini Salad

2 medium or 1 large zucchini, diced (about 2+ cups)
1 cup white beans
1/4 cup sliced red onion
juice of one lemon
1-2 tablespoons extra virgin olive oil
½ teaspoon kosher salt
¼ teaspoon fresh ground pepper
2 tablespoons fresh mint (or parsley or cilantro)

Dice the zucchini and place in a medium bowl.  Add the white beans and sliced red onion.

In a small bowl, mix the lemon juice, oil, salt and pepper.  Stir well and pour over the zucchini and white bean mixture.  Let sit for 15 minutes or longer (if you have the time) to allow the flavors to marinate and intensify.

Sprinkle with the fresh mint and toss well.


Serves 4 as a side.

Life is sweet,
SPC

Monday, August 27, 2012

Apple Cinnamon Baked Oatmeal (Vegan)

Our mornings are busy.  My guess is yours are too.  So what can you do?  Plan ahead.  This naturally sweet baked oatmeal is made the night prior to help make your morning a little less hectic.  But beyond just being easy, this recipe is full of nutritious whole grains. 

Whole grains are a great way to start your family's day.  The complex carbohydrates and fiber keep you feeling full, and give you the energy you need to make it to lunch.  But don't use "whole grains," "complex carbohydrates" and "fiber," to describe the dish below to your family; instead use, "sweet," "warm" and "delicious." 

See?

 Say "hello," to our new favorite warm breakfast, Apple Cinnamon Baked Oatmeal.  We already adore Carrot Cake Baked Oatmeal, but this weekend I found some freshly picked apples and was inspired to work on a new recipe.

Apple Cinnamon Baked Oatmeal

1/4 cup warm water*
3 tablespoons ground flax seed*
2 cups whole oats
1 cup quick oats (or you can use a full 3 cups of either/or type of oats instead)
2 teaspoons ground cinnamon
1/4 teaspoon ground nutmeg
1/2 teaspoon ground ginger
2 teaspoons baking powder
1/3 cup brown sugar
1/2 cup natural applesauce (no sugar added)
1 1/2 cups soy, almond or coconut milk*
1 teaspoon vanilla extract
1 1/2 cups finely diced apple (about two medium apples)
optional:  walnuts, golden or regular raisins

*you may substitute 2 eggs for the warm water and ground flax seed and regular milk for the soy milk to make this more traditionally.

Preheat oven to 350 degrees.

In a small bowl, combine the warm water and ground flax seed (they form a thicker mixture that serves as an excellent egg replacer in this recipe).  Set aside.

In a large bowl, combine the dry ingredients: the oats, cinnamon, nutmeg, ginger, baking powder, and brown sugar.

In a small bowl, combine the wet ingredients:  water/flax mixure (or alternatively, 2 beaten eggs), applesauce, milk and vanilla extract.  Stir well.

Add the wet ingredients to the dry ingredients and mix until fully incorporated. Add the apples and stir well.


Pour into a 9x13 pan and top with raisins and walnuts, if desired.  Bake for 20-30 minutes, or until the oatmeal is firm and slightly browned, if desired.  Alternatively, you can prepare this the night before and bake in the morning.

Makes 8 servings.


I like this recipe with the walnuts and raisins, G and R prefer theirs plain:

 
Actual photo of G's breakfast this morning.  Yes, the kid can't get enough of apples!


Life is sweet,
SPC

Friday, August 24, 2012

Healthy Meal Plan Friday: School's Back in Session

As I type, G is at his first day of Kindergarten.  I wanted to drive him, but he would hear nothing of it:  he was riding the bus.  In a couple hours I'll meet him and R at the bus stop, a surreal moment, the realization that I am no longer a mother of a preschooler, I am a full-fledged elementary school mom.

With school back in session I am kicking off Meal Plan Friday.  I used to share our meals for the week on Monday during the school year, but many of you told me you plan for the next week during the weekend, so I'll start posting meal plan ideas each Friday.

I'll include a weekly Meatless Monday, as well as one or two other extras, like a lunch idea you can make early in the week and eat during the week, or a special snack creation.  I'll also try and mix it up with some vegan, vegetarian and traditional dishes.

Let me know what you think!

Meal Plan:

Our Dinners:
Caramelized Onion Calzones, Fresh Mango, Steamed Broccoli

 
Sweet Potato Enchiladas, Brown Rice with Lime and Cilantro, Fresh Pineapple
Citrus Glazed Chicken, Couscous, Cucumbers, Summer Marinated, Red Grapes


Macaroni and Cheese (with Broccoli, Cauliflower and Bacon), Kiwi Slices
Pizza Soup, Tossed Salad, Raspberries
Thai Vegetarian Wrap, Sweet Potato Fries, Peaches

After-School Snack Special:
Apple Nachos
 

Lunch Special:
Quinoa and Curried Chickpea Salad

Happy Friday All!

Life is sweet,
SPC

Wednesday, August 22, 2012

Slow Cooker Pork Carnitas Tacos

Anyone up for a busy night dinner that is easy and dare I say, a tiny bit exotic, too?

Ahh...slow cooker season is upon us.  You know, the time of the year when the air slowly gets cooler and school is in session?  The time of the year when you need something brewing in the slow cooker because there's nothing quite like coming home to the smell of dinner cooking, especially on a really busy evening?

This is the time of the year when slow cooker recipes begin to appear weekly on our menu plan.  And here's an update of one of family's favorite slow cooker recipes, pork tacos, aka, carnitas.

A quick sear in the morning before you head off to work, school or the day's activities will intensify the flavors.  If you aren't up for it, no worries, just pop the whole pork in the slow cooker sans browning.

Slow Cooker Pork Carnitas Tacos

4-6 pound bone-in pork butt/shoulder
1 tablespoon vegetable oil (if browning)
8 garlic cloves
2 onions
2 jalapenos
1 - 12 oz beer -OR- 1 1/2 cups broth (but trust me, the beer really adds to the flavor)
2 teaspoons cumin
2 teaspoons oregano
1 tablespoon chili powder
1 teaspoon salt
1/2 teaspoon ground pepper
1/2 teaspoon ground dried chipotle pepper or smoked paprika (optional)
corn tortillas
toppings:  pico de gallo, red onion, cilantro, cabbage, avocado, etc.

Score the pork in a grid pattern, about 1/2 " deep.


Heat a large fry pan on high and once hot, pour oil in the pan and place pork in the pan to brown. Cook 4-5 minutes, flip and repeat. 

While the pork is cooking, slice the onions and jalapenos and put them in the bottom of your slow cooker.

Once the pork is seared on both sides, place the pork scored side up in the slow cooker on top of the onions and jalapenos. Gently insert the garlic cloves into the scored pork.


Sprinkle the top of the pork with the cumin, oregano, chili powder, salt, pepper and chipotle pepper or paprika, if using.


Pour the beer over the pork.


Cook on low for 8-10 hours, high 4-5 hours.

Once done, pull the pork out of the slow cooker and let cool for about 10 minutes. Shred the pork and serve in corn tortillas with your favorite toppings. We use pico de gallo, red onion, fresh cilantro, sliced cabbage and fresh lime slices to sprinkle on top. But you can use whatever floats your boat! 


Makes enough for dinner and lots of leftovers, about enough to serve 12.

Life is sweet,
SPC

Monday, August 20, 2012

Lunchbox Mini-Meatloaves

Today's our last day of summer vacation.  The boys are ready to go back, I am ready for them to go back (anyone else remember that old Staples commercial where the dad was gleefully going through the aisles, buying school supplies to the tune of "It's the Most Wonderful Time of the Year?") and yet, I'm also feeling the pangs of "I can't believe my boys are growing up so fast" too.

Tonight I will prepare the first school lunch of the year.  Not sure if I am ready to re-enter the world of daily lunch packing, but ready or not, here school comes!

Here's another great school lunchbox idea, mini-meatloaves.  Make up a batch in your muffin tins, and then freeze the extra for fast lunchbox packing or a really quick dinner.  These meatloaves use ground chicken (you can certainly use ground turkey or beef too), so they're healthier than the standard meatloaf.

Lunchbox Mini-Meatloaves

1 pound ground chicken
2 eggs, beaten well
1/2 teaspoon dry mustard
1/4  teaspoon dried dill
1 tablespoon dried parsley
1 teaspoon onion powder
1 teaspoon garlic powder
1/2 teaspoon salt
1/2 teaspoon ground black pepper
1/4 cup barbecue sauce, divided use
1/2 cup whole wheat breadcrumbs (or just use plain)
1 cup quick oats oatmeal

Preheat oven to 375 degrees.

In a large bowl, mix the chicken and eggs.  Add the dry mustard, dill, parsley, onion powder, garlic powder, salt, pepper and 2 tablespoons barbecue sauce.  Mix well until fully incorporated.

Add the breadcrumbs and oatmeal and mix well until all is fully incorporated. 

Place approximately 2 tablespoons of the mixture in each muffin tin space. 


Spread remaining 2 tablespoons BBQ sauce on top of the mini-meatloaves, if desired.


Bake for 20 minutes or until a meat thermometer reads 165 degrees.

Makes 12 mini-meatloaves.


Life is sweet,
SPC

Thursday, August 16, 2012

Greens and Ham Rolls

Here's another sandwich-less lunchbox idea, a play on the idea I shared on Tuesday, Pizza Rolls.  Instead of using pizza toppings, we used sauteed ham, kale and added some feta cheese.  The result?  R declared these his favorite!

Greens and Ham Rolls

1 pound whole wheat pizza dough (store-bought or you can make homemade pizza dough)
1/2 pound ham, diced
10 oz greens (we used kale, but spinach or chard would also work), chopped
1/4 cup water
dash of onion powder
dash of ground pepper
1/4 cup feta cheese

Preheat oven to 400 degrees.  Grease the insides of two muffin tins.

In a large skillet, over medium heat, saute the ham for about 3-4 minutes, just to crisp it up a bit and release the moisture.  Add the greens, water, onion powder and pepper.

Cover the skillet and allow to cook 4-5 minutes.  Remove the lid and allow any leftover water to evaporate as it cooks an additional minute or two. Remove from the heat and allow to cool.

Divide the dough in 2 pieces and roll each into an approximately 8 by 20 inch rectangle:


On approximately 2/3 of the dough, spread half the toppings.  Top with feta, if desired.  Before rolling, wet your hand and spread some water on the plain dough (this helps the dough "seal" when you roll it up):


Begin rolling, from the side with the toppings, until it is fully rolled. 
Once rolled, use a serrated knife and gently saw off 1 1/2-2 inch pieces, and place them in a greased muffin tin.  Repeat process with 2nd half of the dough and remaining toppings.


 Bake for 18-22 minutes, or until tops brown slightly: 


Serve warm or at room temperature.

Makes 24.

Just like the pizza rolls, you can freeze these in bulk and have them on hand for easy lunch box packing!

I know it might sound hard to believe, but my boys actually loved these more than the pizza rolls...and I loved that they were eating greens and happy.

Life is sweet,
SPC

Tuesday, August 14, 2012

Pizza Rolls (aka, my son does *not* like lunchbox sandwiches)

This will be my third year of packing school lunches and I've learned a few things:

1.  My son does *not* like sandwiches.
2.  I can pack the best lunch ever, but if everyone in the lunchroom is leaving to go play outside, the lunch will remain uneaten.
3.  The lunchroom is chaotic and distracting, so anything I pack should be able to be eaten in about 4 minutes.
4.  My son does *not* like sandwiches (unless you count BLTs, in which case he only eats the bacon).

So I've had to really search high and low for creative lunch ideas.  There are a slew of ideas I typed up on this post about Great Lunchbox Ideas.

The ideas in the post above really helped us through the last two years.  But here it is, the end of summer, and I am wanting to get a little creative.  So today, the first new idea, Pizza Rolls.  These rolls are easy to pack, easy to eat, boast whole wheat and can be packed full of whatever toppings you please.  

Traditional Pizza Rolls

1 pound whole wheat pizza dough (store-bought or you can make homemade pizza dough)
1 cup marinara or pizza sauce (store-bought or you can make homemade pizza sauce)
1 cup diced vegetables (we used bell peppers, spinach and olives, but use your favorite toppings)
1 cup shredded cheese  (we used a combination of mozzarella and Parmesan)

Preheat oven to 400 degrees.  Grease the insides of two muffin tins.

Divide the dough in 2 pieces and roll each into an approximately 8 by 20 inch rectangle:


On approximately 2/3 of the dough, spread half the toppings, just like you would on a regular pizza (**note:  you can customize your roll, as we did below, only using olives on half the roll).  Before rolling, wet your hand and spread some water on the plain dough (this helps the dough "seal" when you roll it up):


Once rolled, use a serrated knife and gently saw off 1 1/2-2 inch pieces, and place them in a greased muffin tin.  Repeat process with 2nd half of the dough and toppings.


(Yes, this picture shows a different type of "roll," another recipe idea I will share...)

 Bake for 18-22 minutes, or until tops brown slightly:


Serve warm or at room temperature.

Makes 24.

I froze these rolls for quick lunchbox packing.  Pull however many you want out of the freezer the night prior and then reheat in the microwave or on the stove-top the next morning before packing.

Life is sweet,
SPC

Monday, August 13, 2012

Back to School Countdown

I am working on some posts with 3 new non-sandwich lunch box original recipes.  I'll post them this week, but I need to fine tune a couple things before I do!  I've received some emails and messages about back-to-school lunches, so I'll be answering those questions too!

Until then, I have some news...

We're at one week and counting before school begins, so all the traditional back-to-school activities have begun; teacher assignments received in the mail, shopping for shoes, preparing for the PTO school supply sale and buy G a backpack. 

Oh, and one more non-traditional activity, we bought our first pets.

Want to guess what sort of pets we bought?

Would you like a hint?  How about two?

Their names are:  Captain Finny...

still no guess?

and Mr. Fish Fish.

Yes, we bought two fish.

G, and to a lesser extent, R, have been asking for a pet.  I went all-out and offered to buy some fish.

G wanted goldfish, R wanted a beta.  The fish store worker took one look at the 5 and 8 year old future fish caregivers and said, "how about some Danio fish?  They're really hearty." 

So, we have two new members of the Sweet Pea Family, happy in their kitchen aquarium.  I am hoping they'll understand the next time I cook seafood!

See that orange fish?  Introducing...Captain Finny.  Mr. Fish Fish was feeling shy.  Note to self:  taking pictures of fish is even harder than taking a family photo in which everyone is smiling...these fish move fast!


I call these fish "starter pets," when they aren't listening.  We'll see how R and G do caring for them and then move up the pet chain...

Life is sweet,
SPC

Friday, August 10, 2012

Asian Tuna Noodles

I sometimes joke that my only exposure to seafood before I met my fish-ophile husband was canned tuna.  Not entirely true, but the large majority of my seafood meals pre-1996 surrounded tuna from a can.  

My least favorite seafood dish was a tuna noodle dish that my wonderful chef-y mom would make, that she topped with crushed potato chips.  I have little to no doubt that the addition of potato chips were an attempt to encourage my brother and I to eat the tuna noodle dish that lurked beneath.  While the potato chip trick worked for my brother, it did not for me.

Fast forward to today and perhaps in a shout out to my mom, I decided to create a new rendition of a tuna noodle dish.  But this is not your mother’s tuna noodle casserole!  This is a version with a bottled asian sauce (I used bottled Soy Vey) to make it super quick and easy.  Instead of cooking in a hot oven, this version is fresh and summer-y.  In fact, the only cooking you will need to do is boiling the noodles for the base of this dish.

Asian Tuna Noodles

½ pound whole wheat angel hair or other thin pasta
1 cup finely sliced or shredded vegetables (carrots, broccoli, bell peppers, etc)

½ cup sliced red or green onion
¼ cup Soy Vey asian dressing (we buy ours at Trader Joe’s but you can find it elsewhere)
2 - 5 ounce cans light tuna, drained
2 tablespoons rice vinegar
2 teaspoons sesame oil
1 clove garlic, minced
¼ cup minced red onion
1-2 tablespoons sesame seeds (optional)
 
Toppings:  minced cilantro, sunflower seeds, lime slices

Cook the pasta according to the package instructions.

Meanwhile, slice and shred the vegetables and onion.  Place the vegetables in a large bowl.

Once the pasta is cooked, drain and pour in the bowl with the vegetables and onion (doing so will allow the residual heat from the pasta to slightly “cook” the vegetables and onion).  

In a separate bowl, combine the remaining ingredients:  the tuna, rice vinegar, oil, garlic, onion and sesame seeds.  Stir well.

Serve ¼ the pasta, topped with a good sized scoop of tuna on top.  Sprinkle with cilantro, sunflower seeds 
and serve with a lime slice.


Life is sweet,
SPC

PS--If you have a vegetarian in your home, omit the tuna on top and use tofu for an instant flexitarian dish.

Wednesday, August 8, 2012

Sweet and Sour Carrot Salad

One of my regular requests from readers is for side dish recipes, which often can be an after-thought when planning a meal.  We sometimes plan out main dishes to make and then at the 11th hour, or the 5 o’clock hour, we realize something else is needed.  If you are looking for an easy and quick summer side, perhaps this will fit the need.

G loves carrots and would happily eat them every day.  His love of carrots inspired this quick carrot dish, based on something I tasted at a local restaurant last month.  I switched out the raisins with dried cranberries and came up with a simple dressing to pull it all together.  G was a fan and now he has a new way to eat 
them!

Carrot Salad

8 carrots washed (you don’t need to peel them) and shredded
2 tablespoons fresh lemon juice
2 tablespoons apple cider or rice vinegar
2 tablespoons honey
¼ cup dried cranberries
½ teaspoon salt
¼ teaspoon dried mustard
dash of ground pepper

Shred the carrots--if you have a food processor, it will help make quick work of this task.  Place in a medium bowl.

In a small bowl, mix the remaining ingredients, stirring well.  Pour over the carrots and stir well to ensure equal coverage.

You may serve immediately or chill until ready to use.  Will last 4 days in your refrigerator.


Serves 4-6 as a side.


Life is sweet (and sometimes a bit sour), 
SPC

Monday, August 6, 2012

What I Learned (About Packing) This Summer

We came back this weekend from our 6th, yes 6th, road trip of the summer.

Before you think we're highfalutin and all, they were mainly trips to family gatherings and we drove each time.  I computed the entire drive time for these 6 trips and we were in the car for...............(wait for it).................  ninety-seven hours.  97!

That's a lot of time on the road!


Since our family is spread up and down the eastern half of the country, we have done more than our fair share of traveling since SPH and met more than 15 years ago.

I like to think I have learned a thing or two from all the traveling we've done this summer and in years' past. So today I share a break from recipes to share my master list of packing advice.

I'm not saying this list will make your packing a breeze, but it will make it go much more smoothly!

Here's what I've learned this summer about packing:

********


1.  Plan before you begin packing:

--Where will we be staying?  Is it with family, or in a hotel?
--Will we have access to a washer and dryer?
--Will we be cooking or eating out?
--What's the weather going to be like?
--Will there be a hair dryer?

God love any place that has a washer and dryer when you are traveling with kids.  Also, if you're staying at a condo or place with a kitchen, take some time to plan out your meals you might be cooking, remembering to bring any kitchen tools that might not be included in the "equipped kitchen."

2.   Plan to have things taken care of with your home while you are away:

--Hold/stop mail and the newspaper, or have neighbor gather them for you.
--Buy or set up a timer on at least one light in your home.
--Plan for someone to help water your plants, if need be.
--Let a neighbor know you'll be gone and give them your cell phone to call you if an issue arises

3.  Begin packing:

--Before you begin packing, save yourself the extra step and begin gathering washed laundry and putting it in a "to pack" pile, if you are able (why hang or put away clothes you will just need to pull out of the closet again?)
--Make a packing list, broken down by:
Clothing (underwear, socks, pants/shorts/skirts, shirts/blouses, sweaters/hoodies, work-out gear, special occasion clothing, shoes, jewelry)
Outerwear/Seasonal (Winter:  jacket, gloves, scarf, hat, boots, snow pants; Summer:  bathing suit/towel, goggles, sunscreen, sunglasses, SPF, bug spray; Rainy:  Boots, umbrella, rain jacket)
Toiletries (remember often forgotten things like simple first aid, pain killers, thermometer, any prescriptions, and everyday items:  toothbrush, toothpaste, floss, contacts/saline, face lotion, body lotion, shampoo/conditioner, make-up, etc...***a good way to make sure you get everything you need is to pull out or write down everything you use for the day or two before you leave, so you don't get to your destination and realize you forgot your razozr**)
Kids  (Favorite stuffed animal/lovey, blanket, pack n' play, stroller, monitor, sippy cups/bottles, etc.  Again, pull out or write down everything you use the day or two before you leave so you remember everything)
Toys/Activities (Books, games, toys, coloring, i Pad/DS, Legos, etc)
Sleeping (PJs, white noise machine, night light, special pillow, ear plugs, etc)
Electronics (Laptop, phone, camera, video camera, iPod, chargers, ear buds, cords, etc)
Snacks/Foods (meals?, drinks, snacks, anything you might need for cooking at a rented condo that you might not want to buy:  salt/pepper and olive oil are easy to pack)
--If your road trip will include an over-night stop before you reach your final destination, include a bag that has all the PJs, clothing and toiletries you will need for just that one night, so you don't have to unpack everything!


4.  Prepare your car:

--Print out or gather maps
--Print out directions (I like to have a hard copy despite using GPS)
--Pack in your car:  tissues, wipes, paper towels, hand sanitizer, 2 bags for trash, hand lotion, chap stick (if you are addicted like me)
--Prepare car entertainment:  prepare CDs, DVDs, books, activity bags (I prepare a bag each for the boys for long trips with activity or sticker books, mazes, Yes and Know Books (invisible ink), Mad Libs, or small toys), Car games (go Momsminivan.com to print out some Car Bingo and other easy car games) and other Creative Car Games that require no materials!
--Gather food and drinks, pack a lunch or dinner if needed or desired.  Don't forget extra napkins and a small garbage bag.
--Remove anything from the trunk that you won't need.

5.  Pack your car:

--Place all the items you need to pack by the car and then treat your trunk or packing space like a puzzle.
--Try to get all the bigger, heavier, boxier items on the bottom and furthest back of the trunk, lighter items on top.
--Use the space by your kids' feet for extra packing space


6.  Before you walk out the door, a final checklist for your home:

--Hold your thermostat at a higher (in the summer) or lower (in the winter) temperature than usual
--Turn of your water main
--Water indoor plants
--Clean out the fridge, if need be
--Empty Garbage and recycling


7.  Two General Tips:

--I like to pack items by rooms of our home...so that when we return home from our trip we can unpack the bags and place them where they can be unpacked eventually.  Better than lots of bags in one big pile!
--If we get back from our trip and I am feeling lazy, I unzip R and G's luggage and place it on their dresser or floor, with any clean clothes still in it, and ask them to choose their outfits out of the luggage until it is empty.

********

Did I forget anything?  I am sure I did, as I feel like each time we travel I pick up a new idea or way to do things.  Please share your best ideas in the comments area!

Life is sweet,
SPC

Thursday, August 2, 2012

Rosemary Lemon Chicken Burgers

Rosemary, sage and thyme are frequent star herbs for a classic roast chicken or turkey.  These herbs are the more woody or hearty of the herb family, and can hold up to a good heavy cooking.  Unlike the tender herbs of parsley, cilantro, mint and basil, among others, the woody herbs are able to withstand lots of cooking and still retain their beautiful flavor.

While rosemary is most notably paired with baked and roasted chicken, I had the idea to use it in a more modern adaptation.  I combined rosemary with lemon and a wee bit of garlic, salt and pepper to flavor chicken burgers.  The flavors worked as deliciously in a burger as in a whole roast bird.

Even better, these burgers can be cooked in about 10-15 minutes, instead of needing hours in a hot oven (something I try to avoid in my kitchen in the summertime!).

Rosemary Lemon Chicken Burgers

1 pound ground chicken
zest of one lemon
1 tablespoon fresh rosemary, chopped fine, plus extra for garnish
1 clove garlic, minced
½ teaspoon salt
¼ teaspoon ground pepper
brown mustard (optional)

In a large bowl, place the ground chicken and top with the remaining ingredients.  Mix very well with your hands, taking special care to ensure all ingredients are fully incorporated into the mixture.

Shape into 8 small patties.

In a hot skillet or on a hot grill, add some oil (take care if using a grill).  Add the patties and cook over medium high heat for 4-5 minutes per side.

Serve two burgers over a bed or rice or pasta, topping with a touch of mustard and a small sprig of rosemary, if desired.

(You can also do these burgers in a more traditional size and serve on buns, or however you please!)


Serves 4.

Life is sweet,

SPC